








ヘッダーセクションのスタイル設定
CoddyのHTMLジャーニー「CSSマスタリー」セクションの一部。レッスン 26/43。

チャレンジ
簡単このミニプロジェクトでは、CSSだけを使って、楽しい趣味のランディングページを作り上げます。
HTMLはすでに用意されています。あなたの仕事は、実際のフロントエンド開発者のように、手順に沿ってスタイルを設定することです。実践的なレイアウトやボタン、スタイリングのテクニックを練習するのに最適です!
最後に作成するページのプレビューはこちらです:
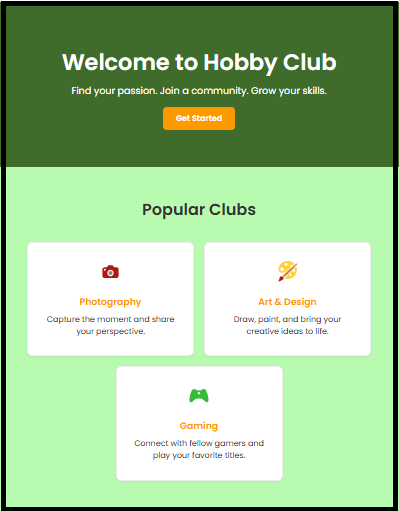
最初のチャレンジでは、ページ上部の部分、つまりheader("hero"セクションとも呼ばれます)のスタイリングから始めます。現在は、上部にプレーンテキストが表示されているだけです。目標は、ページのすっきりとして目を引く導入部分に変えることです。
CSSチャレンジ:
- デフォルトの余白を削除する:
bodyにmargin: 0を設定し、背景色を追加します。 .heroセクションに背景色(rgb(30, 207, 104))とpadding 50pxを設定します。.heroでFlexboxを使用して、すべてを中央揃えにします:display: flexflex-direction: columnalign-items: centerjustify-content: centertext-align: center
.hero h1と.hero pを使ってテキストをスタイリングします。
上部のセクションがすっきりとして目を引くデザインになるようにしてください。
自分で試してみよう
<html>
<head>
  <title>Hobby Club Landing Page</title>
  <link rel="stylesheet" href="styles.css">
</head>
<body>

  <header class="hero">
      <div class="container">
        <h1>Welcome to Hobby Club</h1>
        <p>Find your passion. Join a community. Grow your skills.</p>
        <a href="#" class="btn">Get Started</a>
      </div>
  </header>

  <section class="features">
    <h2 class="section-title">Popular Clubs</h2>
    <div class="cards">
      <div class="feature">
        <div class="icon"><img src="https://upload.wikimedia.org/wikipedia/commons/f/fa/Android_Emoji_1f4f7_red.svg" width="20px"></div>
        <h3>Photography</h3>
        <p>Capture the moment and share your perspective.</p>
      </div>
      <div class="feature">
        <div class="icon"><img src="https://upload.wikimedia.org/wikipedia/commons/5/51/Emoji_u1f3a8.svg" width="20px"></div>
        <h3>Art & Design</h3>
        <p>Draw, paint, and bring your creative ideas to life.</p>
      </div>
      <div class="feature">
        <div class="icon"><img src="https://upload.wikimedia.org/wikipedia/commons/e/e6/Emoji_u1f3ae.svg" width="20px"></div>
        <h3>Gaming</h3>
        <p>Connect with fellow gamers and play your favorite titles.</p>
      </div>
    </div>
  </section>

</body>
</html>
CSSマスタリーのすべてのレッスン
自分で練習してみよう: Webプレイグラウンド