








Recap - Forms #1
Part of the Fundamentals section of Coddy's HTML journey. Lesson 46 of 60.

Challenge
EasyLet's build a simple drink order form using HTML, as shown in the picture below.
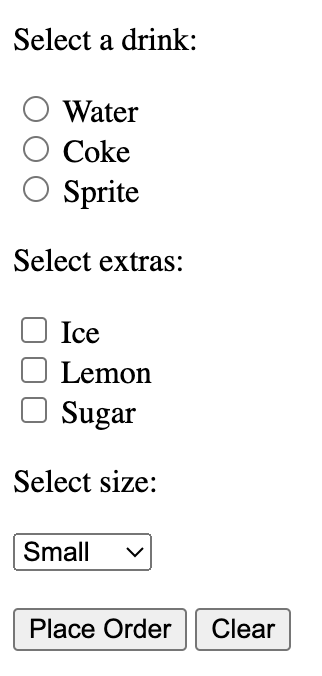
Here's what to include:
- A
<form>tag to wrap everything. - A group of radio buttons (name: "drink") to let users choose their drink. The labels should be "Water", "Coke", or "Sprite".
- A group of checkboxes (name: "extras") for optional add-ons. The labels should be "Ice", "Lemon", or "Sugar".
- A dropdown menu (name: "size") to pick a drink size. The options should be "Small", "Medium", or "Large".
- A submit button labeled "Place Order".
- A reset button labeled "Clear".
⚠️ Important: Use only one <form> tag. HTML does not allow nested <form> tags: placing a <form> inside another <form> is invalid and will cause your inputs to be detected outside the form, breaking the tests. Put all your radio buttons, checkboxes, dropdown, and buttons directly inside the single outer <form>: do not wrap sections in extra <form> tags.
Try it yourself
<!DOCTYPE html>
<html>
    <body>
        <form>
            <p>Select a drink: </p>
            <!-- Write code here -->

            <p>Select extras: </p>
            <!-- Write code here -->

            <p>Select size: </p>
            <!-- Write code here -->

        </form>
    </body>
</html>All lessons in Fundamentals
2Text and Formatting
HeadingsParagraphsLine BreaksBold and Italic TextBold and Italic AgainRecap - Formatting8Forms and Inputs Part 1
Form BasicsText InputsInput AttributesPassword FieldLabels for InputsRecap - Basic Form11Event Registration Page
Project OverviewHeader Section Event Details SectionRegistration FormFooter Section
9Forms and Inputs Part 2
Radio ButtonsCheckboxesDropdownsButtonsButtons in FormsRecap - Forms #1Recap - Forms #2Practice on your own: Web playground